CrossCode Wiki
Advertisement

Gaia's Garden is a location in CrossWorlds. It is the largest area in the game, an immense jungle located to the northeast of Rookie Harbor. It can only be reached after completing Faj'ro Temple.

Gaia's Garden

Gaia's Garden is an enormous jungle and the largest area to be found on Shadoon. Its high trees stand towering beside the many rivers that stretch from the north-west to the south-east. In the center of the jungle a huge lake can be found with a small island that is home to the paradoxical Basin Keep.

In the south-east a small Shad tribe calls the trees their home. They mostly keep to themselves and live in harmony with the jungle. However, tensions between humans and Shad have arisen ever since humans built a power plant at the entrance of the Zir'vitar Temple. A vile infestation has spread in the north-east of the jungle which seems to originate from the power plant.

In the north one can find the mighty Grand Krys'kajo. A tree that stand above all other trees. However to get close to it, A Seeker first needs to to finish the trials of both the Zir'vitar Temple and So'najiz Temple which stand beside the tree.

-Encyclopedia entry

Layout

The area's main entrance from Autumn's Fall leads to a crossroads, where continuing straight will lead to the city of Basin Keep. The left and right paths wrap around the city, eventually meeting up at the three temples of the Grand Krys'kajo. Three sub-areas can be accessed from this ring path: the swampy Royal Grove to the northwest, the shady, mushroom-filled Infested Marshes to the northeast, and Vr'da Vil to the southeast.

Vr'da Vil is a Shad village, and the fifth town reached in the game. It is also the only town that is part of a larger exploration area, rather than being a separate area. Most of the inhabitants are quite hostile to humans, due to some past incident that involves the Wiccats that infest the northern areas of the village; the Shad blame the infestation on the humans' power plant near the temples. The villagers' trust has to be regained by completing a mandatory storyline quest.

Connecting regions

Map

Gaias-garden-map

In-game map of Gaia's Garden

Areas of Gaia's Garden
# Area Name
1 Jungle Entrance

Landmark: Southern Entrance

2 Crossroad
3 Basin Keep Entrance
4 Overgrown Path
5 Drizzle Bosk
6 Wet Passage
7 River's Bed
8 Splitting Stumps
9 Clinging River
10 Ringing River
11 Old Timber
12 Tying Greens
13 Peridot Approach

Landmark: Peridot Approach

14 Rite of Passage

Landmark: Rite of Passage

15 Zir'vitar Temple Entrance
16 Zir'vitar Temple Roof
17 So'najiz Temple Entrance
18 So'najiz Lake Platform
19 Gran Krys'kajo Entrance
20 Vr'da Vil West
21 Vr'da Vil East

Landmark: Vr'da Vil

22 Vr'da Vil North
23 Chief's Den
24 Covert Path
25 Royal Grove

Landmark: Royal Grove

26 Calm Backyard
27 Lost Lookout
28 Seared Lake
29 Infested Marshes South

Landmark: Infested Marshes

30 Infested Marshes North
31 Infested Heart
32 The Descent
33 Root
34 Chilled Den
35 Frozen Lair
36 Lou's Office
37 K'tara's House
38 Chief's House
39 Sacred Pond
40 Dripping Cave
41 Tranquility Pond
42 Lost Shrine Entrance
43 Lost Shrine
44 Lost Puzzle Room
45 Lost Power Room
46 Grubby Cave
47 Temple of Innovation
48 Foul Cavity
49 Infested Cavern Entrance
50 Infested Cavern Maze

Enemies

Name Locations
Papagun-sprite
Papagun
Jungle Entrance, Crossroad, Overgrown Path, Drizzle Bosk, Wet Passage, River's Bed, Splitting Stumps, Clinging River, Old Timber, Tying Greens, Peridot Approach, Vr'da Vil North, Covert Path, Royal Grove, Calm Backyard
Argeby-sprite
Argeby
Jungle Entrance, Crossroad, Overgrown Path, Drizzle Bosk, Wet Passage, River's Bed, Splitting Stumps, Clinging River, Ringing River, Old Timber, Tying Greens, Peridot Approach, Vr'da Vil North, Calm Backyard
Gelleric-sprite
Gelleric
Crossroad, Overgrown Path, Drizzle Bosk, Wet Passage, River's Bed, Tying Greens, Peridot Approach, Covert Path, Royal Grove, Calm Backyard
Shokat-sprite
Shokat
Crossroad, Splitting Stumps, Clinging River, Ringing River, Old Timber, Tying Greens, Peridot Approach, Vr'da Vil North, Calm Backyard, Lost Lookout, Infested Marshes South, Infested Marshes North, Seared Lake
Angler-sprite
Angler
Covert Path, Royal Grove, Calm Backyard
Behesloth-sprite
Behesloth
Ringing River, Lost Lookout, Infested Marshes South, Infested Marshes North, Seared Lake
Jackonfire-sprite
Jack'On'Fire
Lost Lookout, Infested Marshes South, Infested Marshes North, Seared Lake (during Pumpkin Land Superfun quest)
Wiccat-sprite
Wiccat
Vr'da Vil North, Chief's Den

Botanics

The following botanics can be found in Gaia's Garden:

Destroyable Contents
Alpha-Puff-Plant
Alpha Puff Plant
50 to unlock
Loc-Icon Commonly found everywhere but infested- and Vr'da Vil region. 25 to unlock
Beta-Puff-Plant
Beta Puff Plant
50 to unlock
Loc-Icon Commonly found everywhere but infested- and Vr'da Vil region. 25 to unlock
Omega-Puff-Plant
Omega Puff Plant
20 to unlock
Loc-Icon Rarely found on high grounds but infested- and Vr'da Vil region. 10 to unlock
Alpha-Closed-Barelels
Alpha Closed Bareleles
40 to unlock
Loc-Icon Commonly found near water where it's not raining. 20 to unlock
Beta-Closed-Barelels
Beta Closed Bareleles
40 to unlock
Loc-Icon Commonly found near water where it's not raining. 20 to unlock
Bee-Hive
Bee Hive
20 to unlock
Loc-Icon Sporadically found everywhere up against walls and trees. 10 to unlock
Alpha-Open-Barelels
Alpha Open Bareleles
40 to unlock
Loc-Icon Commonly found near water where it's raining. 20 to unlock
Beta-Open-Barelels
Beta Open Bareleles
40 to unlock
Loc-Icon Commonly found near water where it's raining. 20 to unlock
Omega-Open-Barelels
Omega Open Bareleles
15 to unlock
Loc-Icon Rarely found near water where it's raining. 8 to unlock
Alpha-Vivid-Puff-Plant
Alpha Vivid Puff Plant
40 to unlock
Loc-Icon Commonly found in the Vr'da Vil region. 20 to unlock
Beta-Vivid-Puff-Plant
Beta Vivid Puff Plant
40 to unlock
Loc-Icon Commonly found in the Vr'da Vil region. 20 to unlock
Omega-Vivid-Puff-Plant
Omega Vivid Puff Plant
15 to unlock
Loc-Icon Rarely found in the Vr'da Vil region. 8 to unlock
Alpha-Virus-Shroom
Alpha Virus Shroom
40 to unlock
Loc-Icon Commonly found in the infested region of the jungle. 20 to unlock
Beta-Virus-Shroom
Beta Virus Shroom
40 to unlock
Loc-Icon Commonly found in the infested region of the jungle. 20 to unlock
Omega-Virus-Shroom
Omega Virus Shroom
15 to unlock
Loc-Icon Rarely found in the infested region of the jungle. 8 to unlock

Traders

There is only one trader initially but more can be unlocked through quests.

Name Location Trade Offers
Edgy Salesman Jungle Entrance
Trade Offers
LV44Twitching SlicerTwitching Slicer
TradeArrow

LV36Humming RazorHumming Razor × 2 Tremor EngineTremor Engine Static FurballStatic Furball × 4 Precious MetalPrecious Metal × 3 CreditIcon 44444 Credits

LV41Vermillion MantleVermillion Mantle
TradeArrow

Precious MetalPrecious Metal Butter SilkButter Silk × 6 Palette BlossomPalette Blossom × 6 Elder WoodElder Wood × 6 CreditIcon 39666 Credits

V'rda Vil Sets V'rda Vil West
Unlocks after the The Root Cause quest
Trade Offers
Veggie SetVeggie Set
TradeArrow

Common PlanterCommon Planter × 4 CreditIcon 100 Credits

Fruit SetFruit Set
TradeArrow

Curly FarnCurly Farn × 4 CreditIcon 100 Credits

Spice SetSpice Set
TradeArrow

Moon FruitMoon Fruit CreditIcon 250 Credits

Spice SetSpice Set
TradeArrow

Star FruitStar Fruit CreditIcon 250 Credits

V'rda Vil Metals V'rda Vil West
Unlocks after the The Root Cause quest
Trade Offers
Junk MetalJunk Metal
TradeArrow

Curly FarnCurly Farn × 2 Common PlanterCommon Planter × 2 CreditIcon 90 Credits

Refined MetalRefined Metal
TradeArrow

Junk MetalJunk Metal Steel CombSteel Comb × 2 Glowing SphereGlowing Sphere CreditIcon 450 Credits

Precious MetalPrecious Metal
TradeArrow

Refined MetalRefined Metal Elder WoodElder Wood × 2 Virus RootVirus Root × 2 CreditIcon 2500 Credits

Precious MetalPrecious Metal
TradeArrow

Refined MetalRefined Metal Elder WoodElder Wood × 2 Moon FruitMoon Fruit Star FruitStar Fruit CreditIcon 2500 Credits

TurretDefense Trader (Grubby Cave) Grubby Cave
Unlocks after completing Turret Defense
Trade Offers
Elder WoodElder Wood
TradeArrow

Turret TokensTurret Tokens × 2 CreditIcon 600 Credits

Croissant FoodIconCross SandwichCross Sandwich
TradeArrow

Turret TokensTurret Tokens × 15 CreditIcon 5000 Credits

ColdPlatter FoodIconFinal DinnerFinal Dinner
TradeArrow

Turret TokensTurret Tokens × 30 CreditIcon 5555 Credits

LV52Trench BootsTrench Boots
TradeArrow

Turret TokensTurret Tokens × 33 CreditIcon 77777 Credits

TurretDefense Trader (Temple of Innovation) Temple of Innovation
Unlocks after completing An Original Idea
Trade Offers
Elder WoodElder Wood
TradeArrow

Turret TokensTurret Tokens × 2 CreditIcon 600 Credits

Croissant FoodIconCross SandwichCross Sandwich
TradeArrow

Turret TokensTurret Tokens × 15 CreditIcon 5000 Credits

ColdPlatter FoodIconFinal DinnerFinal Dinner
TradeArrow

Turret TokensTurret Tokens × 30 CreditIcon 5555 Credits

LV52Trench BootsTrench Boots
TradeArrow

Turret TokensTurret Tokens × 33 CreditIcon 77777 Credits

Quests

Main article: Gaia's Garden/Quests

The quests that can be started in Gaia's Garden are:

Treasures

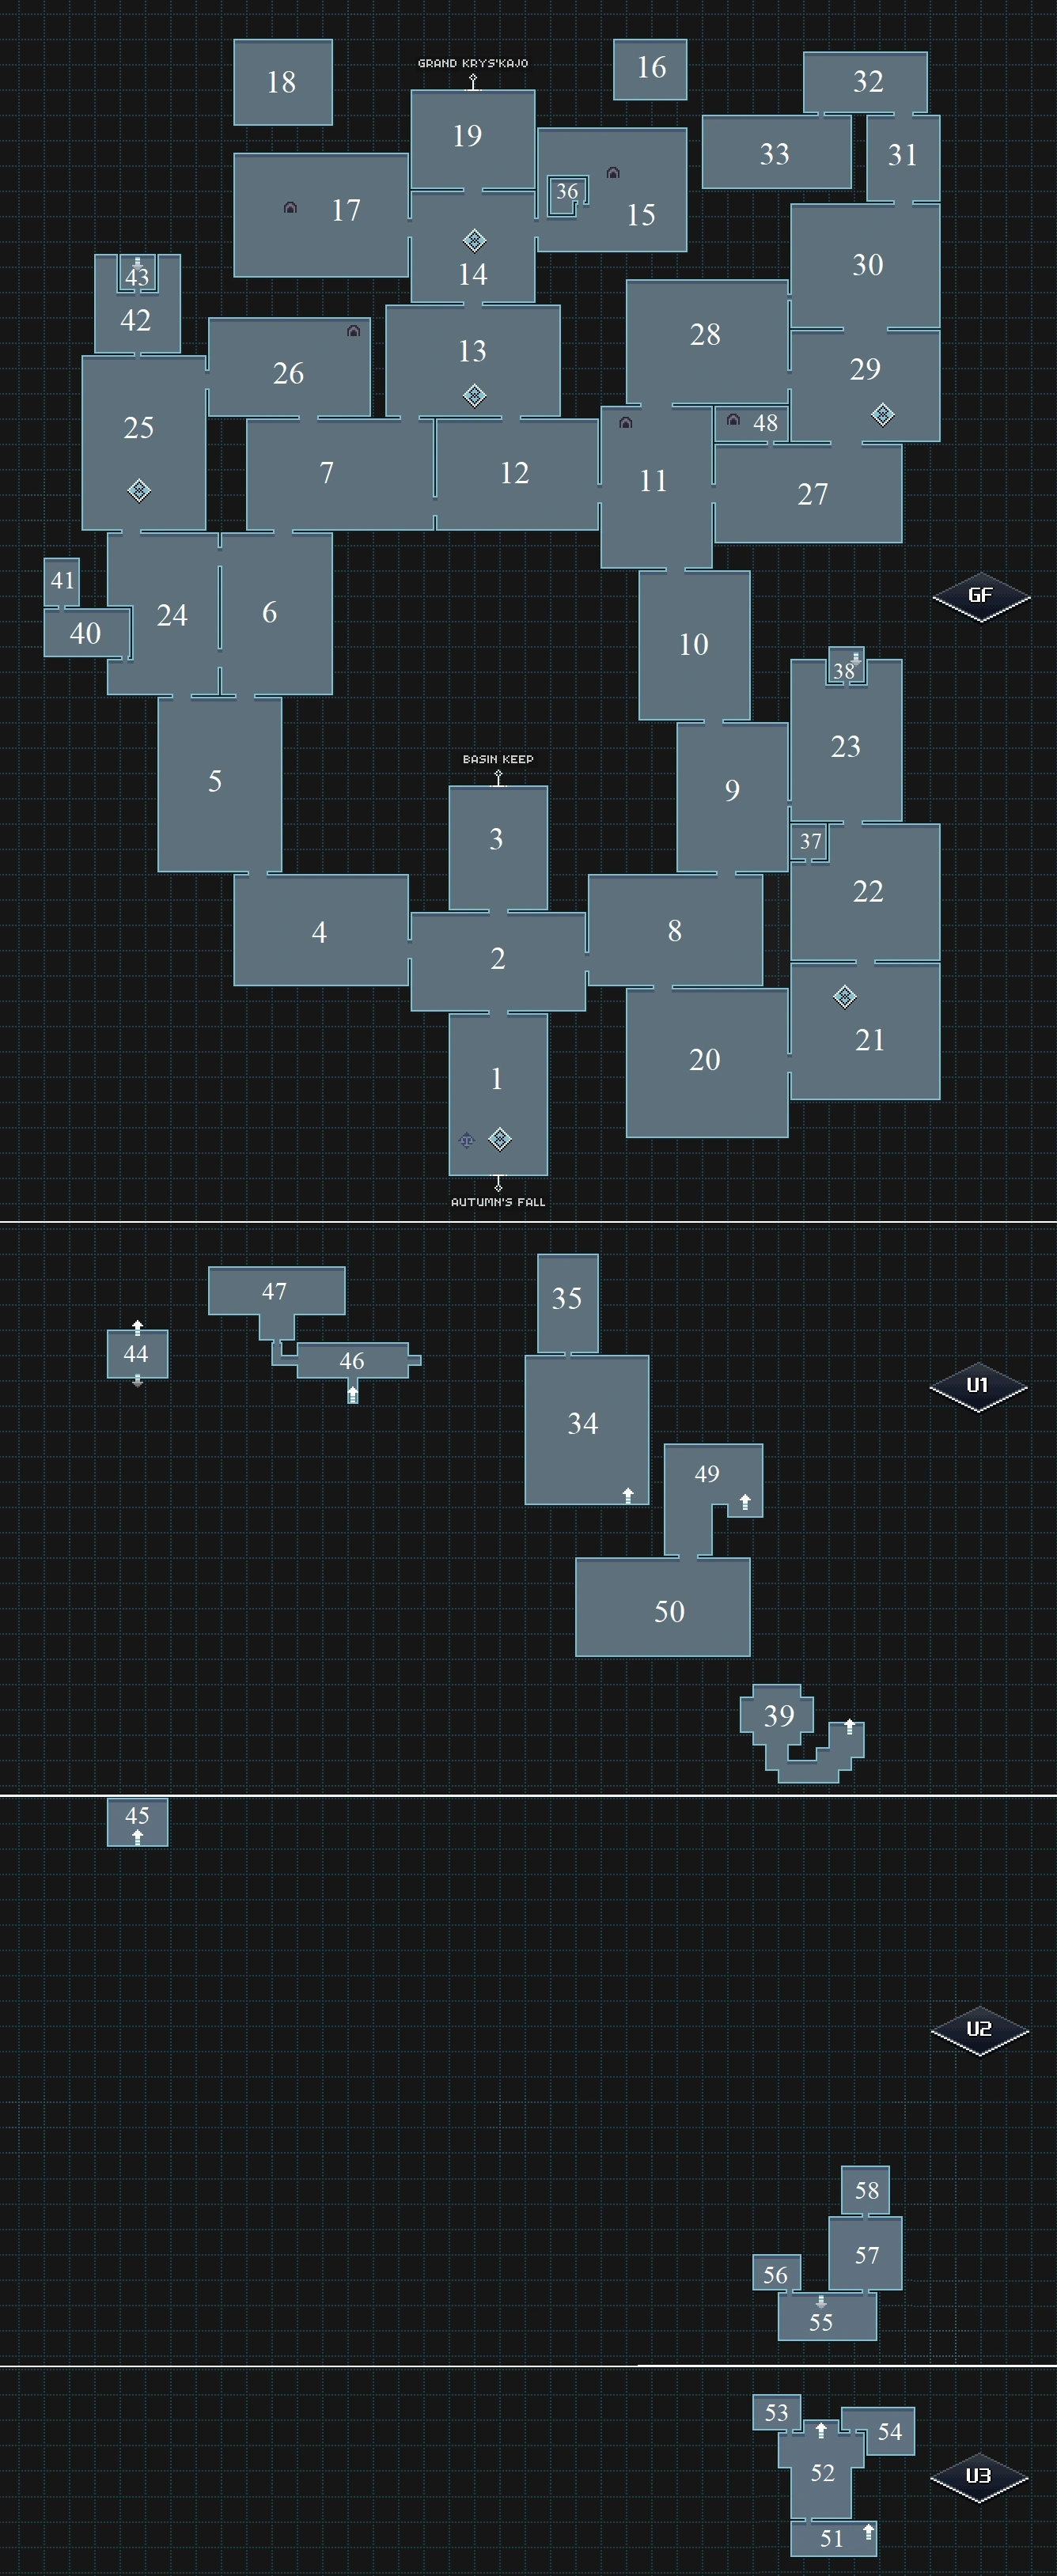
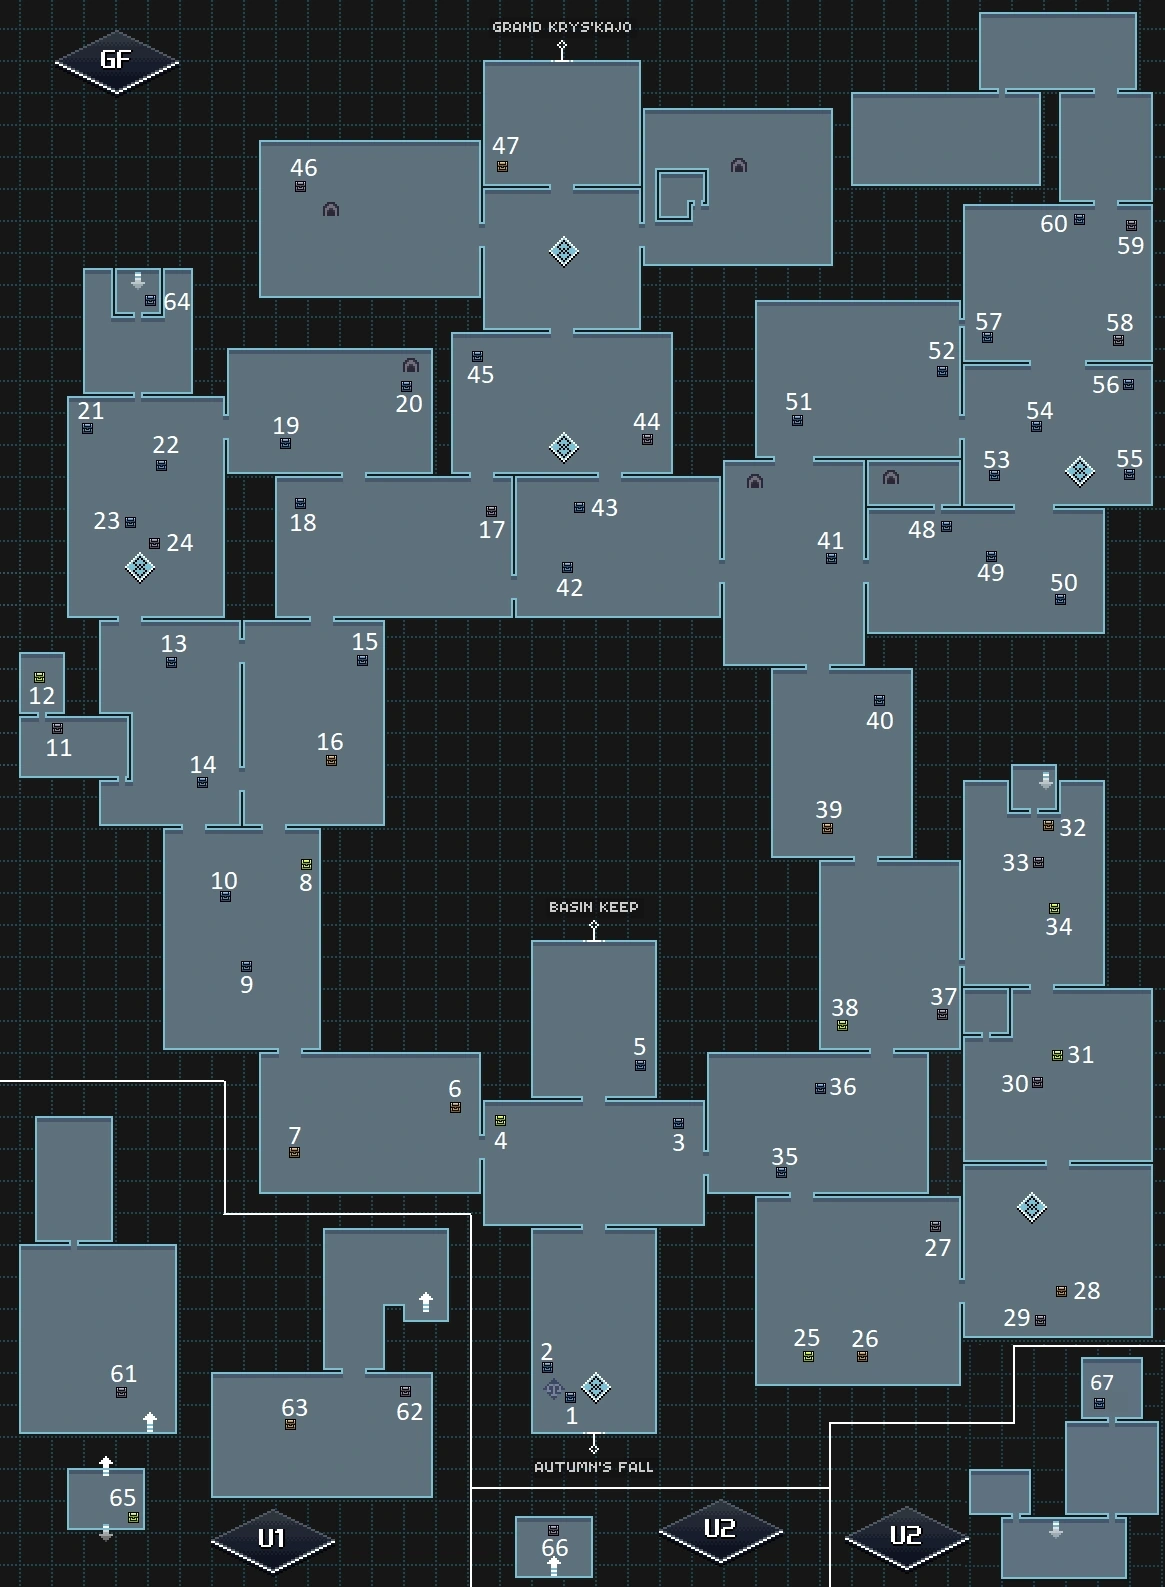
Gaia's Garden has by far the largest number of chests of any area, having at least twice as many as any other area except Maroon Valley. Many of these are not initially accessible, and require either the Radiant KeyRadiant Key from the So'najiz Temple, or the Wave element from the Zir'vitar Temple (to use a Wave teleporter) in order to access them.

Gaia's Garden Treasure Map

Map of chests in Gaia's Garden

Acc. Type Contains Location Info
1 Treasure-default Normal 4 × Salted PeanutsSalted Peanuts Jungle Entrance
2 Treasure-default Normal 8 × Chef SandwichChef Sandwich Jungle Entrance
3 Treasure-default Normal 6 × Elder WoodElder Wood Crossroad Enter on the upper path from Splitting Stumps to reach it
4 Treasure-gold Gold 2 × Epic MetalEpic Metal Crossroad Enter on the upper path from Splitting Stumps to reach it. Radiant KeyRadiant Key required
5 Treasure-default Normal 5 × Steel CombSteel Comb Basin Keep Entrance
6 Treasure-bronze Bronze 5 × Cheese CrackerCheese Cracker Overgrown Path Take the upper path starting in Splitting Stumps to reach here. The Wave element is required
7 Treasure-bronze Bronze 4 × Huge NutHuge Nut Overgrown Path The Wave element is required
8 Treasure-gold Gold 1 × LV41Rough BranchRough Branch Drizzle Bosk Follow the upper path from Splitting Stumps to Overgrown Path and hit the switch at the end. This opens the upper path from Overgrown Path to here. Radiant KeyRadiant Key and the Wave element required
9 Treasure-default Normal 6 × Spiky NutSpiky Nut Drizzle Bosk
10 Treasure-default Normal 4 × Sweet Berry TeaSweet Berry Tea Drizzle Bosk
11 Treasure-silver Silver 6 × Golden BarsGolden Bars Dripping Cave The Wave element is required
12 Treasure-gold Gold 1 × Galaxy BerryGalaxy Berry Tranquility Pond Radiant KeyRadiant Key and the Wave element required
13 Treasure-default Normal 4 × Flaming BunFlaming Bun Covert Path
14 Treasure-default Normal 4 × Moon FruitMoon Fruit Covert Path
15 Treasure-default Normal 5 × Slime DropSlime Drop Wet Passage Take the north entrance from Covert Path to reach here
16 Treasure-bronze Bronze 4 × Chili DogChili Dog Wet Passage Take the north entrance from Covert Path to reach here. The Wave element is required
17 Treasure-silver Silver 4 × Pepper Night TeaPepper Night Tea River's Bed The Wave element is required
18 Treasure-default Normal 7 × Fruit SaladFruit Salad River's Bed Take the secret pathway from Calm Backyard to reach here
19 Treasure-default Normal 4 × MaultascheMaultasche Calm Backyard
20 Treasure-default Normal 6 × Cup o' CoffeeCup o' Coffee Calm Backyard
21 Treasure-default Normal 3 × Glow PearGlow Pear Royal Grove Enter from Calm Backyard to reach this
22 Treasure-default Normal 8 × Common PlanterCommon Planter Royal Grove
23 Treasure-default Normal 7 × Salted PeanutsSalted Peanuts Royal Grove Enter from Calm Backyard to reach this
24 Treasure-silver Silver 3 × Metal DownMetal Down Royal Grove Enter from Calm Backyard to reach this
25 Treasure-gold Gold 5 × Star FruitStar Fruit Vr'da Vil West Radiant KeyRadiant Key required
26 Treasure-bronze Bronze 2 × Metal DownMetal Down Vr'da Vil West
27 Treasure-silver Silver 2 × Plain CubePlain Cube Vr'da Vil West
28 Treasure-bronze Bronze 4 × Snack MixSnack Mix Vr'da Vil East
29 Treasure-silver Silver 5 × Elder WoodElder Wood Vr'da Vil East The Wave element is required
30 Treasure-silver Silver 2 × Precious MetalPrecious Metal Vr'da Vil North
31 Treasure-gold Gold 3 × Star FruitStar Fruit Vr'da Vil North Radiant KeyRadiant Key and the Wave element required
32 Treasure-bronze Bronze 2 × Prime PistachiosPrime Pistachios Chief's Den
33 Treasure-silver Silver 3 × Golden BarsGolden Bars Chief's Den
34 Treasure-gold Gold 1 × Geta StrapsGeta Straps Chief's Den Radiant KeyRadiant Key and the Wave element required
35 Treasure-default Normal 6 × Cup o' CoffeeCup o' Coffee Splitting Stumps Enter on the upper path from Vr'da Vil East to reach it
36 Treasure-default Normal 4 × Royal HiveRoyal Hive Splitting Stumps The Wave element is required
37 Treasure-silver Silver 4 × DurianDurian Clinging River
38 Treasure-gold Gold 1 × LV41Rough BranchRough Branch Clinging River Take the upper path from Ringing River to reach here.Radiant KeyRadiant Key and the Wave element are required
39 Treasure-bronze Bronze 2 × Lazy ClawLazy Claw Ringing River The Wave element is required
40 Treasure-default Normal 6 × Static FurballStatic Furball Ringing River The Wave element is required
41 Treasure-default Normal 7 × Glowing SphereGlowing Sphere Old Timber The Wave element is required
42 Treasure-default Normal 4 × Palette BlossomPalette Blossom Tying Greens
43 Treasure-default Normal 6 × Prime PistachiosPrime Pistachios Tying Greens
44 Treasure-silver Silver 1 × LV45AehreAehre Peridot Approach Enter on the hidden path from Tying Greens to reach it. The Wave element is required
45 Treasure-default Normal 4 × Energy EspressoEnergy Espresso Peridot Approach
46 Treasure-silver Silver 2 × Golden BarsGolden Bars So'najiz Temple Entrance
47 Treasure-bronze Bronze 4 × Crystal WaterCrystal Water Grand Krys'kajo Entrance The Wave element is required
48 Treasure-default Normal 3 × Energy EspressoEnergy Espresso Lost Lookout The Wave element is required
49 Treasure-default Normal 5 × Veggie WrapsVeggie Wraps Lost Lookout
50 Treasure-default Normal 4 × Werewolf StickWerewolf Stick Lost Lookout
51 Treasure-default Normal 2 × Fruit PieFruit Pie Seared Lake
52 Treasure-default Normal 2 × Blazing BunBlazing Bun Seared Lake
53 Treasure-default Normal 3 × Lazy ClawLazy Claw Infested Marshes South Enter from Seared Lake to reach this
54 Treasure-default Normal 9 × Venom ShroomVenom Shroom Infested Marshes South Enter from Seared Lake to reach this
55 Treasure-default Normal 2 × Stout BackplateStout Backplate Infested Marshes South Enter from Seared Lake to reach this.The Wave element is required
56 Treasure-default Normal 2 × Mega-SandwichMega-Sandwich Infested Marshes South
57 Treasure-default Normal 3 × Ginger Tom. SaladGinger Tom. Salad Infested Marshes North Enter from Seared Lake to reach this
58 Treasure-silver Silver 5 × Virus RootVirus Root Infested Marshes North Enter from Seared Lake to hit the switch opening the right path from Infested Marshes South. Return that way to reach the chest
59 Treasure-silver Silver 5 × Golden BarsGolden Bars Infested Marshes North Enter from Seared Lake to hit the switch opening the right path from Infested Marshes South. Return that way to reach the chest
60 Treasure-default Normal 3 × Spicy Beat-0-TypeSpicy Beat-0-Type Infested Marshes North Enter from Seared Lake to hit the switch opening the right path from Infested Marshes South. Return that way to reach the chest
61 Treasure-silver Silver 5 × Perforated TophatPerforated Tophat Chilled Den
62 Treasure-silver Silver 3 × Stout BackplateStout Backplate Infested Cavern Maze
63 Treasure-bronze Bronze 1 × Golden TicketGolden Ticket Infested Cavern Maze
64 Treasure-default Normal 2 × Energy EspressoEnergy Espresso Lost Shrine The entrance to the Lost Shrine isn't marked on the map initially. It's hidden behind the large tree in the north of Royal Grove reachable from Calm Backyard. The code for the shrine is ↑↑↓↓←→←→AB, although the code still must be read first at the northeast of So'najiz Temple Entrance
65 Treasure-gold Gold 3 × Geta GlueGeta Glue Lost Puzzle Room
66 Treasure-silver Silver 1 × LV01Broken DeckBroken Deck Lost Power Room
Advertisement