CrossCode Wiki
Advertisement

Maroon Valley is a location in CrossWorlds. It is a large, dry, hot desert area that has multiple chasms and an oasis.

Maroon Valley

Maroon Valley is a dry and hot area located on the western side of the continent. The terrain is mostly eroded and some parts are under the constant grinding pressure of a sandstorm. The storm itself, however, is not a product of natural air movement. The scientists of Shadoon assume that some Ancients Technology causes it, as no other explanation could be found. Despite the harsh nature of the area there are some parts that fight back, such as the Maroon Oasis, which is filled with lush plantlife. To the west of the area one can find the home of the Shad tribe: Ba'kii Kum.

-Encyclopedia entry

Layout

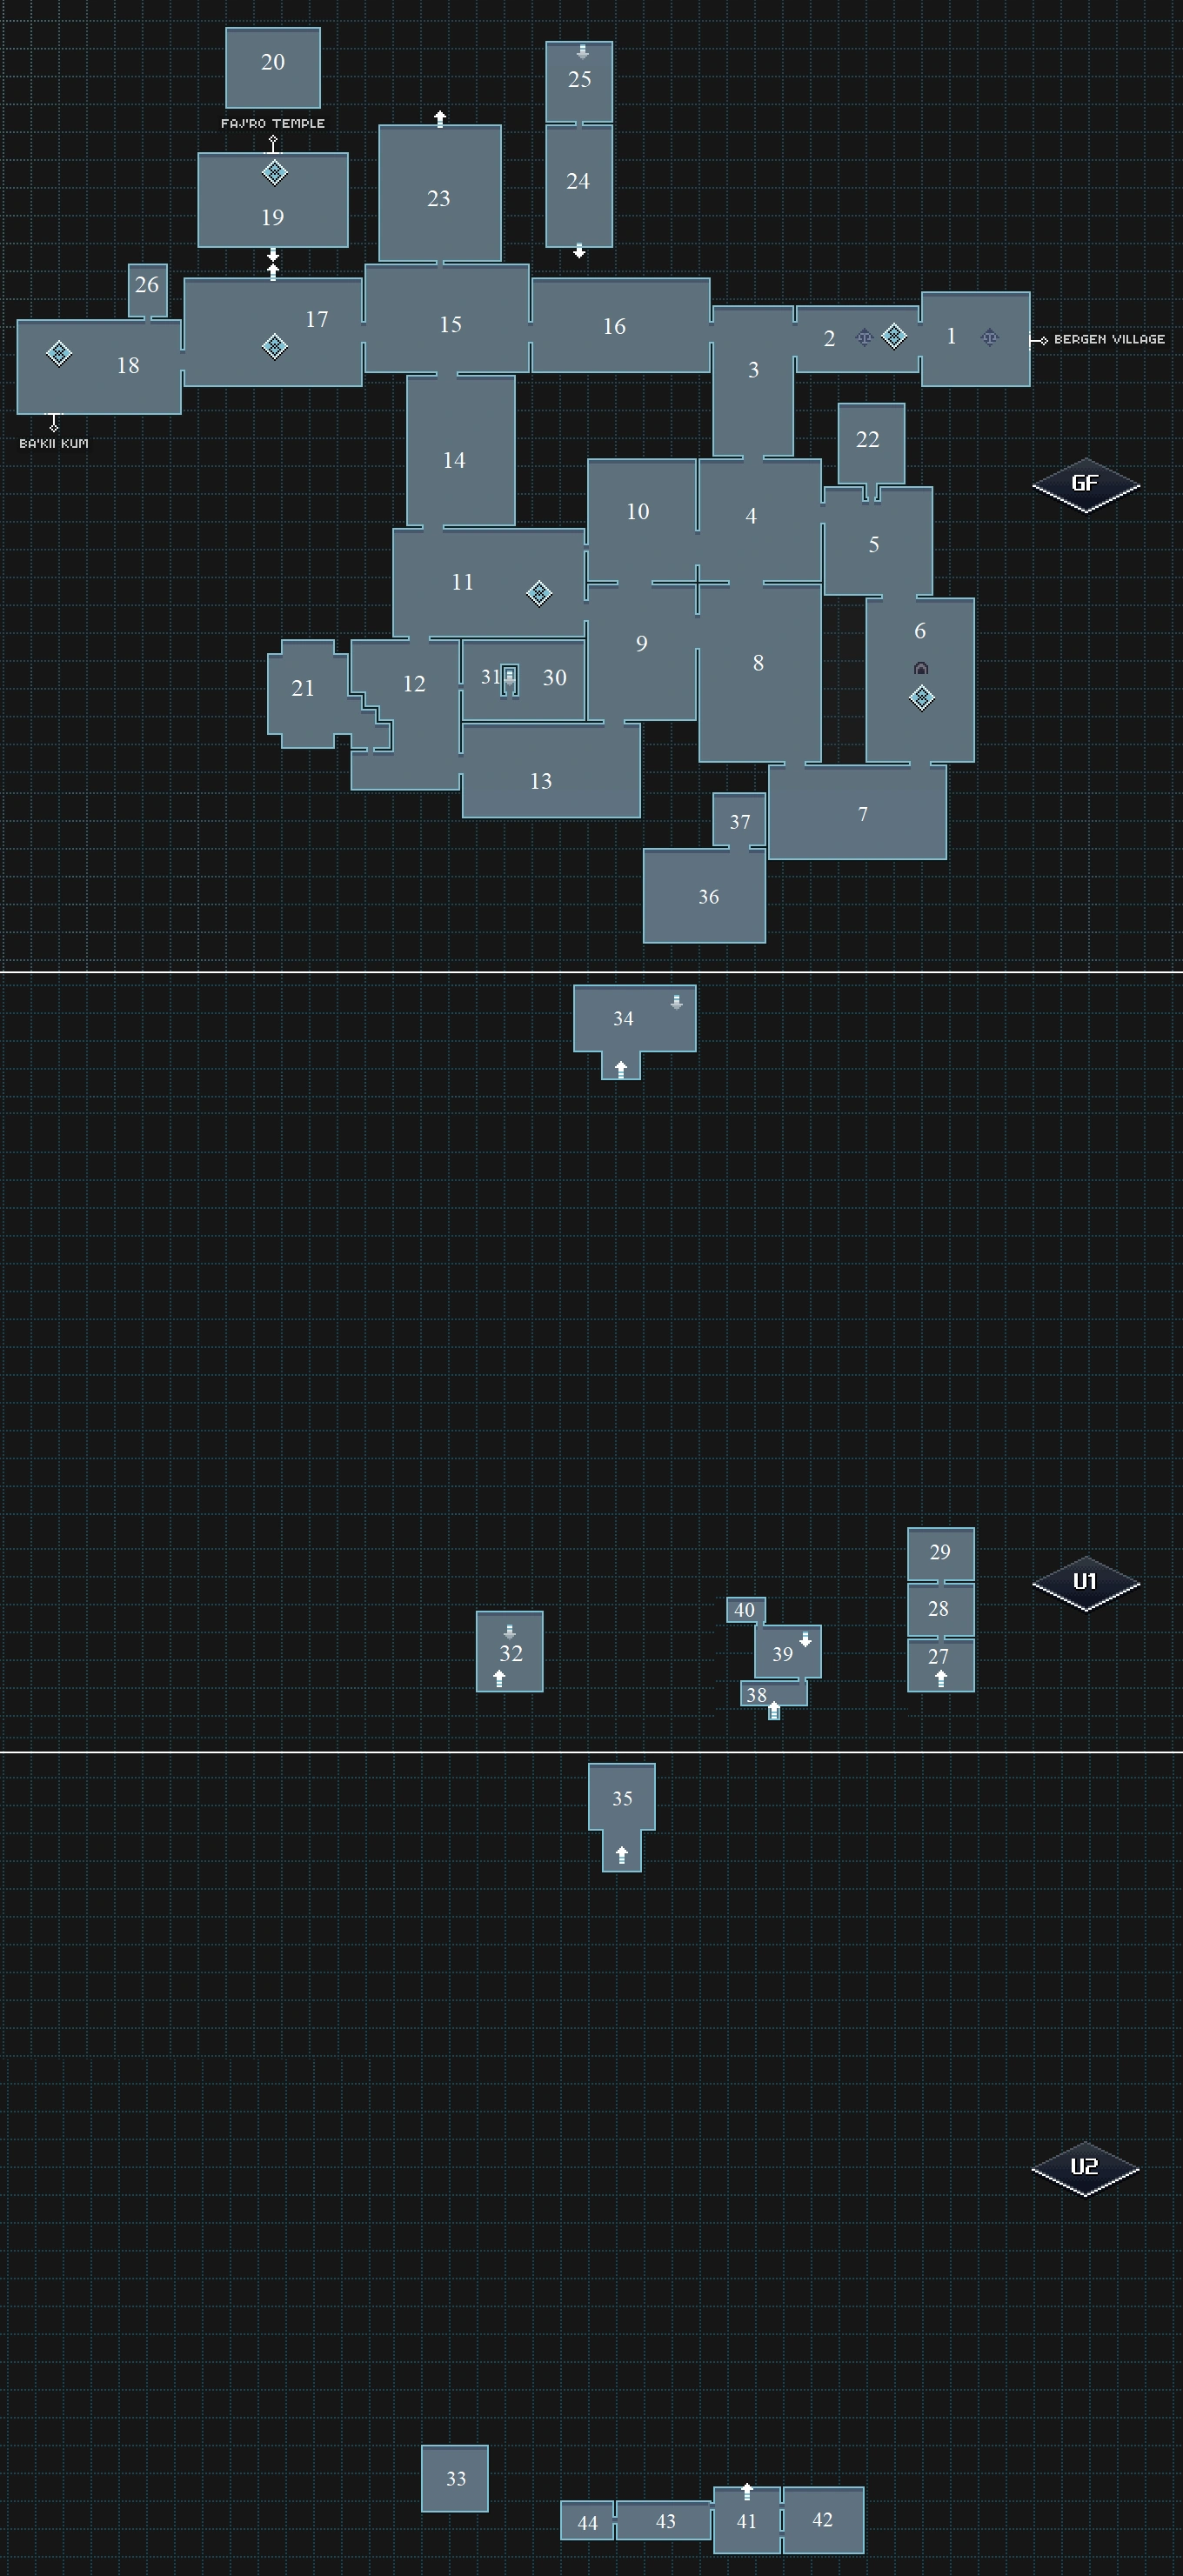
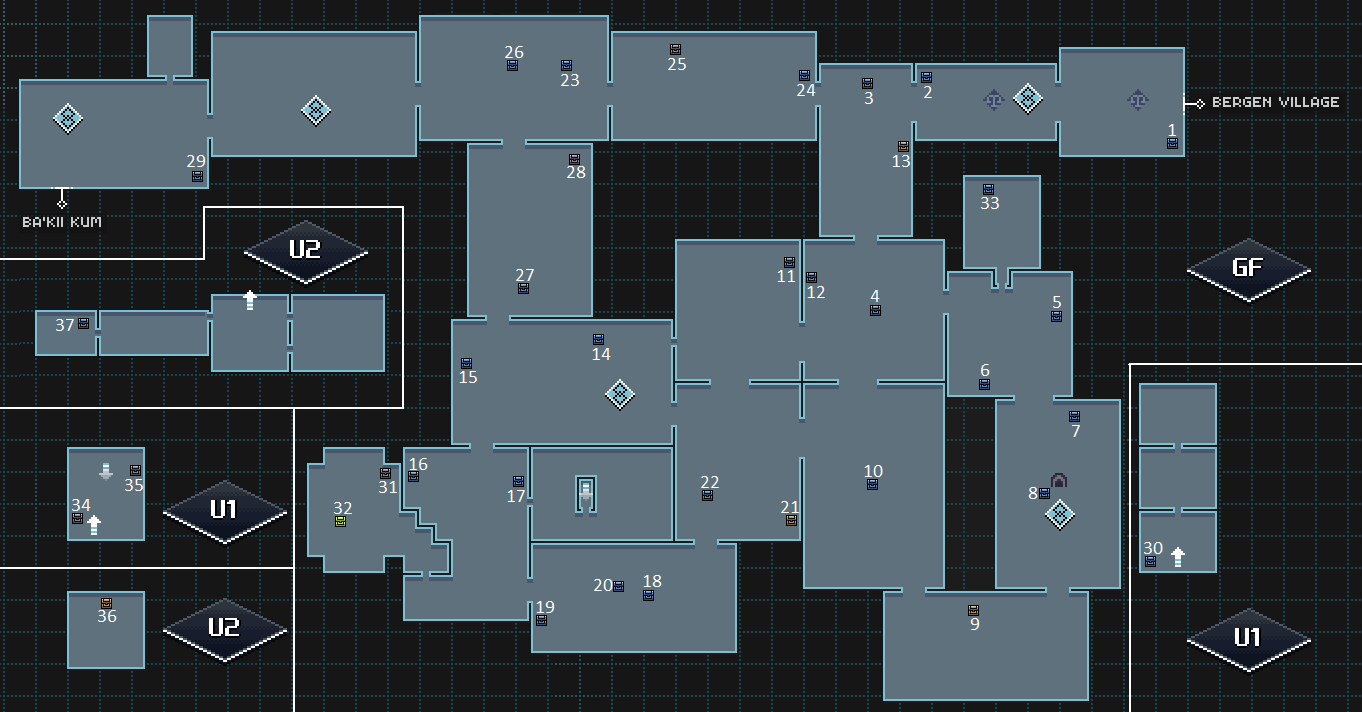
Maroon Valley is located in between Ba'kii Kum and Bergen Village. You can get there by leaving Bergen Village to the west. The area itself is complex and full of puzzles, with many areas being difficult to access. On the map below, the main path through the area is 1-2-3-4-(8/10)-9-11-14-15-17-18. All three other loops can only be unlocked in one direction (forward for the Maroon Oasis, and backward for the other two), and require completing numerous puzzles to proceed. River Cliff/Endless Pit in particular requires you to start in Barren Land and follow an upper, puzzle-filled path through Overpass to reach the areas.

Maroon Oasis

The Maroon Oasis is a lush area found on the east side of Maroon Valley. It's filled with all sorts of plant and wild life and is crowned by a majestic tree which strongly resembles a maroon or cherry tree.

But it bears no fruits and blossoms all year, leaving petals on the ground for animals to eat or people to gather.

It is assumed that the tree itself is the reason the oasis still exists. Scientists who studied the tree found that it produces nutrients and channels them into the ground using the sunlight, something Maroon Valley has plenty of.

-Encyclopedia entry

Connecting regions

Map

Maroon-Valley-Map

In-game map of Maroon Valley

Areas of Maroon Valley
# Area Name
1 Rising Railway
2 East Entrance

Landmark: East Entrance

3 Dusty Path
4 Crossroad
5 Vivid Path
6 Maroon Oasis

Landmark: Maroon Tree

7 Bright Path
8 Long Piece
9 Barren Arcs
10 Barren Land
11 Overpass

Landmark: Arcing Stones

12 River Cliff
13 Endless Pit
14 Paw Cliffs
15 Torn Road
16 Fractured Path
17 Great Scar

Landmark: Hourglass Pillar

18 West Entrance

Landmark: West Entrance

19 Temple Entrance

Landmark: Temple Entrance

20 Faj'ro Roof
21 Mystery Cave
22 Toisecave
23 Windless Caverns
24 ??? Temple 1
25 ??? Temple 2
26 Brigand Cave
27 Maroon Cave 1
28 Maroon Cave 2
29 Maroon Cave 3
30 Deadly Oasis
31 Bone Lair
32 Cursed Temple
33 Treasure Room

Enemies

Name Locations
Pinceron-sprite
Pinceron East Entrance, Dusty Path, Crossroad, Paw Cliffs, Torn Road, Great Scar, West Entrance, Fractured Path, Maroon Oasis, Bright Path
Boss-pincer-sprite
Boss Pincer Torn Road, Great Scar, West Entrance, Fractured Path
Sharkster-sprite
Sharkster Crossroad, Long Piece, Barren Arcs, Barren Land, Overpass, Paw Cliffs
Volturbine-sprite
Vulturbine Paw Cliffs, Great Scar, West Entrance, River Cliff, Endless Pit, Vivid Path, Maroon Oasis, Bright Path
Drilltoise-sprite
Drillertoise Crossroad, West Entrance, River Cliff, Vivid Path, Maroon Oasis, Bright Path
Chillertoise-sprite
Chillertoise Toisecave (during sidequest only)
Tim-sprite
Tim Long Piece, Barren Arcs, Barren Land, Overpass, West Entrance

Botanics

Unlike in previous regions, many of the destructible items in Maroon Valley can only be found in specific areas, rather than being distributed throughout the whole map.

Destroyable Contents
Heat-Cactus-Dry-1
Alpha Dry Cactone
40 to unlock
Loc-Icon Commonly found everywhere but Oasis region. 20 to unlock
Heat-Cactus-Dry-2
Beta Dry Cactone
40 to unlock
Loc-Icon Commonly found everywhere but Oasis region. 20 to unlock
Heat-Dry-Bush-1
Alpha Dry Shrub
50 to unlock
Loc-Icon Commonly found everywhere but Oasis region. 25 to unlock
Heat-Dry-Bush-2
Beta Dry Shrub
50 to unlock
Loc-Icon Commonly found everywhere but Oasis region. 25 to unlock
Heat-Dry-Bush-Special
Omega Dry Shrub
20 to unlock
Loc-Icon Rarely found everywhere but Oasis region. 10 to unlock
Heat-Cactus-1
Alpha Cactone
25 to unlock
Loc-Icon Found only in the Oasis region. 13 to unlock
Heat-Cactus-2
Beta Cactone
25 to unlock
Loc-Icon Found only in the Oasis region. 13 to unlock
Heat-Cactus-Special
Omega Cactone
10 to unlock
Loc-Icon Found rarely in the Oasis region. 5 to unlock
Heat-Palmapple-1
Alpha Palmapple
25 to unlock
Loc-Icon Found only in the Oasis region. 13 to unlock
Heat-Palmapple-2
Beta Palmapple
25 to unlock
Loc-Icon Found only in the Oasis region. 13 to unlock
Heat-Palmapple-Special
Omega Palmapple
10 to unlock
Loc-Icon Found rarely in the Oasis region. 5 to unlock
Heat-Hill-1
Alpha Ant Hill
30 to unlock
Loc-Icon Commonly found in regions with sand storms. 15 to unlock
Heat-Hill-2
Beta Ant Hill
30 to unlock
Loc-Icon Commonly found in regions with sand storms. 15 to unlock
Heat-Hill-Special
Omega Ant Hill
10 to unlock
Loc-Icon Rarely found in regions with sand storms. 5 to unlock
Heat-Bones-1
Alpha Bone Pile
25 to unlock
Loc-Icon Commonly found in the southern cliffs region. 13 to unlock
Heat-Bones-2
Beta Bone Pile
25 to unlock
Loc-Icon Commonly found in the southern cliffs region. 13 to unlock
Heat-Bones-Special
Omega Bone Pile
10 to unlock
Loc-Icon Rarely found in the southern cliffs region. 5 to unlock

Traders

Name Location Trade Offers
Player Trader East Entrance
Trade Offers
Sandwich FoodIconChef SandwichChef Sandwich
TradeArrow

Veggie SetVeggie Set × 2 Fruit SetFruit Set × 2 CreditIcon 950 Credits

GreenTea FoodIconSweet Berry TeaSweet Berry Tea
TradeArrow

Veggie SetVeggie Set Fruit SetFruit Set Spice SetSpice Set CreditIcon 1050 Credits

Maroon Buffs East Entrance
Trade Offers
SpicyBun FoodIconFlaming BunFlaming Bun
TradeArrow

Fruit SetFruit Set × 2 CreditIcon 550 Credits

FruitSalad FoodIconFruit SaladFruit Salad
TradeArrow

Fruit SetFruit Set × 2 CreditIcon 550 Credits

RiceCracker FoodIconTofu CrackerTofu Cracker
TradeArrow

Veggie SetVeggie Set × 2 CreditIcon 550 Credits

VeggieSticks FoodIconVeggie WrapsVeggie Wraps
TradeArrow

Veggie SetVeggie Set × 2 CreditIcon 550 Credits

Maroon Equipment East Entrance
Trade Offers
LV24Rapier CarrotRapier Carrot
TradeArrow

Frosted CarrotFrosted Carrot × 8 Vivid WaterVivid Water × 14 Ancient EarthAncient Earth × 3 Drill StoneDrill Stone × 2 CreditIcon 8870 Credits

LV24Fin CapFin Cap
TradeArrow

Rusty BitsRusty Bits × 17 Winter ThornWinter Thorn × 6 Poison StingerPoison Stinger × 4 Dry FinDry Fin × 2 CreditIcon 9180 Credits

LV24Dessert VestDessert Vest
TradeArrow

Frozen TearFrozen Tear × 9 Palmapple SeedPalmapple Seed × 10 Cactone FruitCactone Fruit × 10 Squishy TeethSquishy Teeth CreditIcon 9230 Credits

LV24Desert SandalsDesert Sandals
TradeArrow

Feather LeafFeather Leaf × 23 Tough SandTough Sand × 21 Helix RelicHelix Relic × 9 Phoenix FeatherPhoenix Feather × 3 CreditIcon 9050 Credits

Maroon Loot East Entrance
Trade Offers
Dry FinDry Fin
TradeArrow

Poison StingerPoison Stinger × 2 Tough SandTough Sand × 2 CreditIcon 600 Credits

Drill StoneDrill Stone
TradeArrow

Poison StingerPoison Stinger Dry FinDry Fin Arid LumberArid Lumber Helix RelicHelix Relic CreditIcon 700 Credits

Phoenix FeatherPhoenix Feather
TradeArrow

Poison StingerPoison Stinger Dry FinDry Fin Arid LumberArid Lumber Glaring RockGlaring Rock CreditIcon 800 Credits

Squishy TeethSquishy Teeth
TradeArrow

Drill StoneDrill Stone Phoenix FeatherPhoenix Feather Rainbow GemRainbow Gem CreditIcon 1050 Credits

Maroon Metals East Entrance
Trade Offers
Junk MetalJunk Metal
TradeArrow

Tough SandTough Sand × 2 Old BonesOld Bones Vivid WaterVivid Water CreditIcon 90 Credits

Refined MetalRefined Metal
TradeArrow

Junk MetalJunk Metal × 2 Arid LumberArid Lumber × 2 Glaring RockGlaring Rock Helix RelicHelix Relic CreditIcon 450 Credits

Maroon Trade Sets East Entrance
Trade Offers
Veggie SetVeggie Set
TradeArrow

Vivid WaterVivid Water Crystal LeekCrystal Leek Arid LumberArid Lumber CreditIcon 100 Credits

Fruit SetFruit Set
TradeArrow

Tough SandTough Sand × 2 Palmapple SeedPalmapple Seed CreditIcon 100 Credits

Spice SetSpice Set
TradeArrow

Rainbow GemRainbow Gem Maroon ChestnutMaroon Chestnut CreditIcon 250 Credits

Bracerboy Rising Railway
Trade Offers
LV25Prickly BracerPrickly Bracer
TradeArrow

Spice SetSpice Set × 3 Purple Ore LumpPurple Ore Lump × 11 Blue OrbBlue Orb × 3 Solid BubbleSolid Bubble × 4 CreditIcon 9458 Credits

Quests

Main article: Maroon Valley/Quests

The quests that can be started in Maroon Valley are:

Treasures

Maroon Valley Treasure Map

Map of chests in Maroon Valley

Acc. Type Contains Location Info
1 Treasure-default Normal 3 × Frosted CarrotFrosted Carrot Rising Railway Use the crates to jump far enough
2 Treasure-default Normal 6 × Golden SatchelGolden Satchel East Entrance Use the crates filled with vegetable to get up
3 Treasure-default Normal 4 × Arid LumberArid Lumber Dusty Path (Top)
4 Treasure-default Normal 2 × Vanilla Ice CreamVanilla Ice Cream Crossroad (Right side)
5 Treasure-default Normal 7 × Vivid WaterVivid Water Vivid Path (Bridge)
6 Treasure-default Normal 2 × Palmapple SeedPalmapple Seed Vivid Path (Bottom) Halfway through the puzzle to continue to the Oasis
7 Treasure-default Normal 6 × Fruit SaladFruit Salad Maroon Oasis (Top)
8 Treasure-default Normal 2 × Maroon ChestnutMaroon Chestnut Maroon Oasis (Tree)
9 Treasure-bronze Bronze 1 × LV28Hidden BladeHidden Blade Bright Path
10 Treasure-default Normal 4 × Pepper Night TeaPepper Night Tea Long Piece Lower the barrier on the right of the area
11 Treasure-default Normal 3 × Chili DogChili Dog Barren Land Solve the puzzle in the upper part
12 Treasure-default Normal 2 × Golden BarsGolden Bars Crossroad (Left side) From the upper right side of Barren Land, after solving the puzzle there
13 Treasure-bronze Bronze 1 × LV25Thief's BandThief's Band Dusty Path (Mid) Complete the puzzle in Long Piece, follow the upper path to Crossroad and hit the switches. Then pass through the upper puzzles in Barren Land, and pass through Crossroad on the left ledge
14 Treasure-default Normal 4 × Phoenix FeatherPhoenix Feather Overpass (Top) From the upper left side of Barren Land, after solving the puzzle there
15 Treasure-default Normal 2 × Blazing BunBlazing Bun Overpass (Left side) Unlock the overpass from the upper left side of Barren Land, then jump onto the platform near the left side of the overpass
16 Treasure-default Normal 6 × Crystal LeekCrystal Leek River Cliff (Left side)
17 Treasure-default Normal 1 × LV25Mighty StrandMighty Strand River Cliff (Right side) Jump down the Lily pads, activate the switch, use the High Jump Panel. Complete the Faj'ro Temple to get the White KeyWhite Key to open this chest
18 Treasure-default Normal 5 × Old BonesOld Bones Endless Pit (Mid right)
19 Treasure-default Normal 3 × Ancient EarthAncient Earth Endless Pit (Bottom left)
20 Treasure-default Normal 2 × Lucid ShardLucid Shard Endless Pit (Mid left) From the upper right side of River Cliff; you must hit three switches in Endless Pit first to open the path
21 Treasure-bronze Bronze 7 × Glaring RockGlaring Rock Barren Arcs (Right side) Solve the puzzle on the right, entrance hidden behind the Trees
22 Treasure-default Normal 3 × Squishy TeethSquishy Teeth Barren Arcs (Mid) Enter from Barren Land bottom right after finishing the puzzles there
23 Treasure-default Normal 4 × Flaming BunFlaming Bun Torn Road (Right side)
24 Treasure-default Normal 2 × Rainbow GemRainbow Gem Fractured Path (Right side) Activate the switch
25 Treasure-silver Silver 6 × Chef SandwichChef Sandwich Fractured Path (Mid) Complete the Faj'ro Temple to get the White KeyWhite Key to open this chest
26 Treasure-default Normal 3 × Golden SatchelGolden Satchel Torn Road (Locked) Enter from upper part of Great Scar
27 Treasure-default Normal 3 × Drill StoneDrill Stone Paw Cliffs (Mid) Enter from upper part of Great Scar, use the High Jump Panel, enter from Torn Road (bottom left)
28 Treasure-silver Silver 5 × Shrimp RisottoShrimp Risotto Paw Cliffs (Top right) Enter from upper part of Great Scar, use the High Jump Panel, enter from Torn Road (bottom left), beat all Sharkster. Complete the Faj'ro Temple to get the White KeyWhite Key to open this chest
29 Treasure-default Normal 2 × Hardened LiverHardened Liver West Entrance Solve the puzzle in the upper part
30 Treasure-default Normal 6 × Kebab RollKebab Roll Maroon Cave 1
31 Treasure-silver Silver 3 × Lucid ShardLucid Shard Mystery Cave Complete the Faj'ro Temple to get the White KeyWhite Key to open this chest
32 Treasure-gold Gold 1 × Everlasting AmberEverlasting Amber Mystery Cave Complete the So'najiz Temple to get the Radiant KeyRadiant Key to open this chest
33 Treasure-default Normal 1 × Aged TravelguideAged Travelguide Toisecave Found during the Blasting Shells sidequest
34 Treasure-silver Silver 4 × Ancient EarthAncient Earth Cursed Temple Area accessible during the A Promise Is a Promise 3 Quest. Chest is on the left path in the Cursed Temple.
35 Treasure-silver Silver 1 × LV35Bright BracerBright Bracer Cursed Temple Area accessible during the A Promise Is a Promise 3 Quest. Chest is on the right path in the Cursed Temple.
36 Treasure-bronze Bronze 1 × LV01Broken SwordBroken Sword Bone Lair Area accessible during the A Promise Is a Promise 3 Quest. Received after defeating the Cused Sharkster.
Advertisement